Guide to lead assignment rules in Salesforce
Use SFDC lead assignment rules to get more done, create a better experience, and close deals faster.

Table of contents
What are Salesforce lead assignment rules?
What if your sales team could spend their valuable time connecting with prospects and closing deals — instead of losing time doing admin work like assigning and organizing leads?
When you automate lead assignment and routing, your sales team can:
Boost sales team productivity and efficiency
Prevent high-quality leads from slipping through the cracks
Create a better experience for potential customers
Speed up your entire sales pipeline to close more deals, faster
In this blog post, we'll discuss the ins and outs of Salesforce lead assignment. We'll cover the benefits, how to plan your lead assignment strategy, and a step-by-step walkthrough of adding lead assignment rules in Salesforce. We'll also explore the power of scheduling automation to simplify and speed up lead assignment, routing, and qualification.
Key takeaways:
Lead assignment rules help sales teams boost productivity, respond to leads faster, and make better data-driven decisions.
Matching leads with the right sales reps and teams creates a better customer experience by responding to leads faster and giving them personalized attention.
Before you set up your lead assignment rules, work with your sales, marketing, and RevOps teams to understand your lead generation processes and sales team structure.
Within Salesforce lead management settings, rule entries are the individual criteria and actions. A “lead assignment rule” refers to a set of rule entries.
Automating lead routing, qualification, and booking with Calendly helps your team be more efficient and organized while creating a better experience for prospective customers.
6 benefits of creating lead assignment rules in Salesforce
Why should your team take the time to set up lead assignment rules in Salesforce? Here are six great reasons:
Ensure leads are assigned to the right reps and teams: Lead assignment rules mean each incoming lead is directed to the salesperson or team who has the relevant expertise and skills to engage and convert that lead. Automated lead assignment also prevents leads from falling through the cracks by making sure each lead is assigned to a rep or team, rather than relying on manual assignment.
Respond to leads faster: With lead assignment rules, leads are automatically assigned to the right salesperson, reducing response time and increasing the chances of converting leads into customers.
Boost sales team productivity: Automating lead assignment reduces manual work for RevOps teams and sales managers. Lead assignment rules also help identify and prioritize leads more likely to convert, saving time and resources that would otherwise be wasted on pursuing poor-fit leads. These time savings let sales teams focus on nurturing leads and closing deals.
Create a better customer experience: Leads can be assigned to sales reps who have relevant industry or product expertise, understand their unique needs, and can provide personalized solutions. This tailored approach creates a better experience for leads, which results in more conversions and higher customer satisfaction.
Improve sales forecasting: With well-defined lead assignment rules, you can gather more accurate data on lead distribution and conversion rates. This data can be used for sales forecasting, data driven decision-making, and resource allocation.
How to create lead assignment rules in Salesforce
Step 1: Build your lead assignment strategy
Before you go into your Salesforce instance and set up lead assignment rules, you need to figure out what exactly those rules will be. The options are limitless — where should you start?
It’s time to bring RevOps, sales, and marketing together to answer some questions:
Lead sources: Where do leads come from? Do we use marketing forms through Salesforce web-to-lead forms or a third-party integration? Are we importing leads via the data import wizard?
Sales team structure: How is the sales team structured? Are different teams or individuals specialized in specific products, industries, use cases, or regions?
Lead data: What info do we request from new leads? Which standard and custom fields do we require?
Sales territories: How are sales territories defined? Are there specific regions, countries, or territories we should take into account for lead assignment?
Integrations: Do we have any third-party integrations with lead assignment or distribution features? Are we using those features?
Special circumstances: Are there any priority levels or tiers for leads that require special attention? For example, do we have a designated rep or queue for leads with complex needs and use cases?
Poor fits: What should we do with leads who don’t meet any of our criteria?
It’s a lot of information to gather and organize, but it’s important to learn as much as possible up front to cover every scenario and equip your sales team with accurate data. Putting this time and effort in now will pay off tenfold in productivity once your lead rules are in place!
Step 2: Set up lead assignment rules in Salesforce
You’re almost ready to enter your lead assignment rules in SFDC. First, let’s go over some terminology. We’ve been talking about lead assignment rules as individual directives: “If the lead matches X, then do Y.” Within Salesforce lead management settings, a “lead assignment rule” refers to a set of rule entries. Rule entries are the individual criteria and actions (“If X, then do Y”). An assignment rule can consist of up to 3,000 rule entries, and you can only have one active assignment rule at a time.
For example, a rule entry can assign all leads interested in a particular product to a queue of reps who are experts on that product. In Salesforce, a lead queue is essentially a bucket for unassigned leads, and you can choose which sales reps can pull leads from each queue.
Another rule entry can assign all leads from companies with over 5,000 employees to your top enterprise sales rep.
To create a lead assignment rule in Salesforce:
From Setup, enter “Assignment Rules” in the Quick Find box, then select Lead Assignment Rules.
Click New.
Enter the rule name. (Example: 2023 Standard Lead Rules)
Select “Set this as the active lead assignment rule” to activate the rule immediately.
Click Save.
Click the name of the rule you just created.
Click New in the Rule Entries section.
Enter an order number that tells Salesforce when to run this rule entry in relation to other rule entries. For example, if you want this to be the first criteria Salesforce looks at when assigning a lead, enter number one.
Select the rule criteria. What attributes must the lead have before Salesforce applies the rule entry? You can use any standard or custom field in the lead record for your criteria. For example, you want to assign leads to your U.S.-based enterprise sales team, so the company size field must be equal to or greater than 5,000 and the country field must equal the United States. You can include up to 25 filter criteria.
Choose the user or queue to be the assignee if the lead meets the criteria. For example, assign to the U.S.-based enterprise sales team queue.
Optional: Choose an email template to use when notifying the new lead owner. After you set up your lead rules, you can also use Salesforce Flow automations to notify lead owners via other channels. For example, at Calendly, we integrate Salesforce with Slack, and a workflow automatically notifies sales reps via Slack when a lead is assigned to them.
Click Save.

Salesforce goes through the rule entries in order until it finds one that matches the lead's info, then routes the lead accordingly.
Let's say you have small business, mid-market, and enterprise sales team queues. Your first three rule entries would match company size to each of those three queues. If they don't have a company size listed, or the company size doesn't match any of the values in your rule entries, Salesforce will move on to the industry rule entries.
To make sure no leads fall through the cracks, you also need to set a default lead owner. If the assignment rules fail to locate an owner, or you don’t set up assignment rules, web-generated leads are assigned to the default lead owner.
To select a default lead owner:
From Setup, enter “Lead Settings” in the Quick Find box, then select Lead Settings and click Edit.
Define the Default Lead Owner. The Default Lead Owner can be a specific user or a queue.
Save your settings.
Salesforce lead assignment rule examples
As we mentioned earlier, your rule entries can include up to 25 filter criteria.
Simple rules include just one filter criteria:
By country or state/province: Route leads from specific states or countries to sales representatives who understand the regional market. You need this rule if your team uses sales territories to divide leads. For example, if the state/province equals Alaska, Arizona, California, Hawaii, Nevada, Oregon, or Washington, assign the lead to the West Coast queue.
By language: Assign leads to sales reps who speak the same language.
By industry: Assign leads from different industries to salespeople who have experience working with those industries.
By company size: Assign leads based on the size of the company, assigning larger companies to a dedicated enterprise sales team.
Complex rules use two or more filter criteria. For example, you could route leads from specific states or provinces to salespeople based on their sales territory and the company size. If you have a particular rep (Bob) working enterprise leads on the West Coast, your filter criteria could say: If the state/province equals Alaska, Arizona, California, Hawaii, Nevada, Oregon, or Washington, and the company size equals greater than 5,000, assign the lead to Bob.
These are just a few examples. Lead assignment rules can be customized to fit your team’s and customers’ needs. Review your strategy to choose the right combination of criteria for your sales processes, products, and customers.
What does the built-in Salesforce lead process look like in action?
A website visitor named Nora fills out a contact form to learn more about your product. She shares her name, email address, company name (Acme Inc.), and company size. You use Salesforce’s built-in web-to-lead forms, so Nora’s form submission automatically creates a lead record.
Your team has set up lead assignment rules that assign leads to sales queues based on their company size. Acme Inc. has 5,000 employees, so Nora is automatically assigned to the enterprise sales team queue.
Enterprise sales team queue members receive an email notification that a new lead has been added to the queue. Taylor, an enterprise sales rep in Acme Inc.’s territory, assigns Nora’s lead record to themself.
Taylor emails Nora to set up a qualification call.
Nora, who has been waiting to hear back from your team, agrees to meet with Taylor. After some email back-and-forth, they find a time that works.
What are the limitations of Salesforce’s built-in lead assignment rules?
Salesforce’s built-in lead assignment rules are a great place to start, but there are a few critical limitations, especially for enterprise sales teams:
Single level of evaluation: Salesforce assignment rules operate based on a single level of evaluation, meaning that once a rule matches the criteria and assigns a lead, the evaluation process stops. Your team might miss out on important info, like a complex use case or unique industry, when matching the lead with a rep.
No built-in round robin distribution: Round robin lead distribution is the process of assigning leads to reps based on factors like team member availability or equal distribution for a balanced workload. Salesforce lead assignment rules don't include an easy way to set up round robin distribution — you need an additional tool like Pardot, one of the round robin apps on AppExchange, complex Apex code, or a third-party lead routing platform.
No lead escalation settings: Lead escalation is the process of flagging a lead to higher levels of management or specialized teams for further assistance or action. This process comes into play when a lead requires additional attention or intervention beyond the assigned salesperson or team's capabilities. Unfortunately, Salesforce doesn’t have built-in settings for lead escalation rules. If your customer success team uses Service Cloud, you can set up escalation rules for customer support case escalations, but this feature isn’t included in Sales Cloud.
High maintenance for large organizations: Managing and maintaining a comprehensive set of assignment rules can become challenging and time-consuming in large organizations with complex sales structures and multiple teams or regions. Sure, you can include up to 3,000 rule entries in a single lead assignment rule, but that’s a lot to set up and keep up to date — especially if you’re trying to save your team time, not add to their workload.
Built-in Salesforce lead assignment rules and automations are a solid starting point, but what about automating lead qualification and booking? If you use Salesforce on its own, your reps might still spend a ton of time on lead reassignment to balance their workload, manual lead qualification, and email back-and-forths to schedule sales calls.
That’s where Calendly comes in.
How to automate lead assignment, qualification, and booking with Calendly
Your scheduling automation platform can be an excellent lead generation, qualification, and routing tool — especially when it integrates with Salesforce. Calendly’s Salesforce integration helps your team be more efficient and organized while creating a better experience for prospective customers.
When a lead books a meeting via a sales rep or team’s Calendly booking page, Salesforce automatically creates a new lead, contact, or opportunity. If the lead already exists in your Salesforce instance, the event is added to the lead’s existing record, so you don’t end up with duplicate lead records or time-consuming manual reassignment.
What if you don’t want to let just anyone book a meeting with your team? When you add Calendly Routing to your marketing forms, you can show scheduling pages only to leads who meet your qualifications, like prospects from specific industries or companies of a certain size. That way, your busy team can spend time on the most valuable deals.
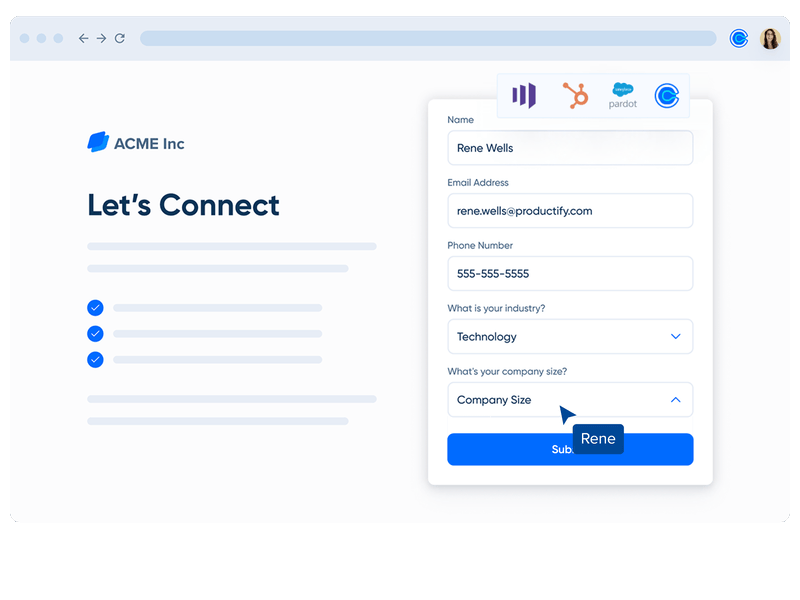
Calendly Routing works with HubSpot, Marketo, Pardot, and Calendly forms and is built for your Salesforce CRM. You can use any form field (email, domain, company name) in any Salesforce standard object to match visitors with their account owner. Account lookups let you send known leads or customers from your website form directly to their account owner’s booking page, without needing to manually reassign leads to the right rep.

Remember the lead assignment example we walked through earlier featuring Nora from Acme Inc.? Here's what that process looks like when you add Calendly:
Nora fills out your “contact sales” form, which is already built in HubSpot, connected to Calendly Routing, and enriched with Clearbit.
She enters her email address in the form, and Clearbit fills in the company name, size, and industry. This shortens the form, so Nora only has to input her name and job title.
Calendly checks to see if Acme Inc. has an account in your Salesforce instance. They don’t, so the next step is lead qualification.
Based on Nora’s information — company size, industry, job title — she’s a highly qualified lead, so she’s automatically routed to the booking page for your enterprise sales team.
Nora is happy about that, and immediately books a meeting time that works for her, with the exact team she needs to talk to.
On the backend, Calendly’s Round Robin meeting distribution is set to optimize for availability, so it assigns the meeting to the first available sales rep — in this case, Taylor. This automation helps your team respond to meeting requests faster, hold initial sales calls sooner, and balance the workload across reps.
Calendly creates a lead record in Salesforce with the info Nora entered into your website form (including the data from Clearbit) and an activity log of any meetings she books with your team via Calendly. Salesforce automatically makes Taylor the lead owner.
If you were relying on Salesforce’s built-in lead assignment rules, Nora’s lead record would have gone to an enterprise sales queue, and she would have had to wait for a rep to pick up the lead and reach out to her to book a meeting.
“A good tool is one that’s so simple, sales reps can basically forget about it and let the meetings roll in. That’s essentially what happened when we implemented Calendly.”

Julia Pan
Sales Enablement Manager at SignPost
What happens if a lead doesn’t qualify for a meeting? Instead of sending them to a booking page, you can display a custom message with next steps, ask them for more information, or redirect them to a specific URL, like a piece of gated content or a webinar signup page.

Automating lead assignment with Calendly Routing has been a game changer for RCReports, a compensation analysis solution for accountants and business valuators. Before connecting Calendly Routing with their Salesforce instance, RCReports’ AEs spent at least five hours a month reassigning leads booked on the wrong calendar. This created a disjointed customer experience and frustration for the sales and marketing teams.
“Now that we’ve implemented Calendly’s routing feature with Salesforce integration, demos are always booked with the correct AE, reducing friction for both our team and the customer.”

Abbie Deaver
Director of Marketing at RCReports
Users on Calendly’s Teams plan and above can connect Calendly to Salesforce. The full suite of Salesforce routing features, including routing by Salesforce ownership, is available on Calendly’s Enterprise plan.
To learn more about Calendly Routing, get in touch with our sales team.
Spend less time on manual lead assignment and more time closing deals
When you automate Salesforce lead assignment and routing, high-value leads stop slipping through the cracks, the workload is balanced across the team, leads are matched with the sales reps best equipped to help them, and team members have more time to focus on connecting with prospects and closing deals.
The results? A more productive team, faster sales cycle, higher conversion rates, and better customer experience.

Webinar: How Calendly Uses Calendly to Close More Deals
Related Articles


![[Blog Hero] How to write sales follow-up emails that keep deals moving](https://images.ctfassets.net/k0lk9kiuza3o/2jnxlw4N57RFSC8QoRZcs1/510f5f21bafe1009b54c1b7a87bfa67f/Sales_follow-up_emails.png?w=2400&q=85&fm=avif)
Don't leave your prospects, customers, and candidates waiting
Calendly eliminates the scheduling back and forth and helps you hit goals faster. Get started in seconds.