Territory management in Salesforce: Definition, benefits, and key automations
Learn the ins and outs of Salesforce territory management for enterprise sales teams.

Table of contents
What is Salesforce territory management?
If your organization is considering automating territory management in Salesforce, this guide is for you. We’ll cover the benefits of territory management, best practices, and a step-by-step walkthrough of setting up Enterprise Territory Management features in Salesforce CRM. We'll also explore the power of scheduling automation to simplify and speed up lead assignment, routing, and qualification.
Territory management and sales strategy
Imagine an enterprise software company, Acme Inc., that sells to customers in a wide range of industries. Each account executive (AE) on Acme's sales team specializes in a specific industry. Acme's sales territory plan defines territories based on industry, and each AE is assigned to the territory that matches their area of expertise. When an account or opportunity matches the criteria for that territory, they're automatically assigned to the correct rep.
How do companies like Acme Inc. benefit from sales territory management?
Efficient resource allocation: By focusing on specific territories, sales team members can focus on particular regions or customer segments, which avoids duplicate efforts, maximizes productivity, and ensures no potential opportunities slip through the cracks.
Better collaboration: Territory assignments mean that each sales rep knows their responsibilities and doesn’t step on toes by pursuing the same opportunities. Plus, sales teams working within the same territories can share knowledge and best practices, and work together on challenging accounts or opportunities.
Time savings: Automated assignment rules ensure that leads, accounts, and opportunities are automatically routed to the appropriate sales reps based on predefined criteria. This automation saves time and effort for sales reps, enabling them to focus on engaging with prospects and customers rather than manually handling assignments.
Personalized customer experience: Sales reps become experts on the needs, preferences, and challenges of customers in their territories, allowing reps to provide customized solutions and build stronger customer relationships.
Data-driven decision making: Reporting on the performance of different territories helps sales managers identify high-performing territories and opportunities for improvement, then strategize accordingly.
Territory management works best for enterprise companies with complex sales structures, segmentation, and lead processes, because it allows organizations to manage large sales teams and diverse territories efficiently.
Salesforce territory management best practices
Follow these five best practices to make the most of your sales territory plan:
Clearly define territories: Start by dividing your sales regions or customer segments in a way that makes sense for your business processes and sales team structure. Define clear boundaries for each territory so sales reps know exactly which areas they’re responsible for.
Set salespeople up for success: When designing territories, aim to distribute accounts and opportunities fairly to balance the workload and give each rep an equal chance to hit their quotas. Avoid creating territories with significantly different sales potential.
Ask for feedback: Involve your sales reps in the territory planning process. They have valuable, on-the-ground insights, and involving them creates a sense of ownership and investment to succeed in their territories.
Use high-quality data: Follow Salesforce best practices for keeping your Salesforce data up to date. Accurate data about accounts and opportunities is vital for proper territory assignment and prevents sales reps from wasting time on incorrect or duplicate leads.
Review and realign territories with care: Regularly review your territories to keep them aligned with your sales goals and target market. To minimize disruptions to your sales process, limit how often you restructure territories. When you make a change, communicate transparently with the sales team about the updates, provide training and support during the transition, and monitor the impact on sales performance.
How to set up territory management in Salesforce
The Enterprise Territory Management (ETM) feature in Sales Cloud provides a framework for defining territories based on various criteria such as geography, industry, company size, or other custom criteria. ETM is included in the Developer, Performance, Enterprise, and Unlimited editions of Sales Cloud.
Before we dive into setup instructions, let’s define a few key Salesforce terms you’ll run into along the way:
Enterprise Territory Management (ETM): A Salesforce feature that lets organizations divide their sales teams into specific territories and automate the assignment of accounts and opportunities.
Territory assignment rule: A set of criteria that automatically determines which accounts and opportunities are assigned to specific territories. For example, accounts in California with more than 5,000 employees belong in Enterprise West Coast Territory. Accounts are assigned to territories when the account record is created or updated.
Territory type: The category of a specific territory. For example, you could create a territory type called “U.S. Geographic” that includes territories based on states or regions.
Parent and child territories: The hierarchical relationship between two territories. The parent or top-level territory can include multiple child territories, each representing a more specific sub-region or customer segment. Within these territory structures, sales reps assigned to a child territory also have access to the parent territory's accounts and opportunities. For example, a rep assigned to California (child territory) would have access to all West Coast (parent territory) accounts and opportunities.
Territory model: The hierarchical structure that organizes territories, defining how they’re grouped and managed within the organization. Each territory model can have up to 1,000 territories.
Territory hierarchy: The page in Salesforce that shows the territory model’s structure. From here, you can create and edit territories, run assignment rules, and activate or archive the model.
Role hierarchy: How you structure and organize user roles and access permissions within Salesforce. Salesforce grants users access to records within their assigned territories based on their position in the role hierarchy.
Now we’ll walk through the ETM implementation process.
How to enable Enterprise Territory Management:
From Setup, enter Territories in the Quick Find box.
Select the territory settings.
Click Enable Enterprise Territory Management.
How to create territory types:
From Setup, enter Territory Types in the Quick Find box.
Select Territory Types.
Click New Territory Type.
Enter a label and a description. For example, your label could be “U.S. Geographic,” and your description could say, 'Territories based on geographic regions in the United States.”
Click Save.
How to create a territory model:
From Setup, enter Territory Models in the Quick Find box.
Select Territory Models.
Click New Territory Model.
Name your model. For example, you could call your model “North America Sales Model.”
Click Save.
How to create territories for your new territory model:
From Setup, enter Territory Models in the Quick Find box.
Select Territory Models.
Find the territory model where you want to create the territory, then click View Hierarchy.
To create a parent territory, hover over the model name and click Create Territory.
To create a child territory from an existing territory, hover over the territory name and click Create Territory.
On the New Territory page, name the territory and choose its territory type.
If the accounts, opportunities, and leads in this territory require different user access than your default role hierarchy, define the territory’s user access levels.
How to create rules to assign accounts to territories:
From Setup, enter Territory Models in the Quick Find box.
Select Territory Models.
Find the territory model where you want to create the territory, then click View Hierarchy.
Select the territory where you want to create a rule.
On the detail page, in the Assignment Rules Defined in this Territory list, click New.
On the rule edit page, enter a name for the rule.
Enter the selection criteria for the rule. For example, if your territories are split up by region, you can filter based on State or Country fields.
If you want the rule to apply to this territory’s child territories, select Apply to child territories.
If you want the rule to run when a user creates or updates an account, select the Active checkbox.
Click Save.

Here are a few more examples of criteria you can use to assign and manage territories:
Industry: Assign accounts to territories based on their industry or market segment to ensure specialized sales expertise. For example, route all accounts classified as “Healthcare” to the “Medical Industry” territory and accounts categorized as “Technology” to the “IT Sector” territory.
Company size: Assign accounts and leads to territories based on their company size. For example, route all accounts with more than 5,000 employees to the “Enterprise” territory.
Product: Route accounts to territories based on the specific products they’re interested in, aligning sales reps’ expertise with customer needs. For example, assign accounts interested in “Cloud Computing Solutions” to the “Cloud Services” territory and accounts looking for “Business Intelligence Software” to the “Analytics Solutions” territory.
Lead source: Assign leads to territories based on the source they came from, like marketing campaigns or referrals. For example, assign leads generated from the “Webinar Registration” source to the “Online Marketing” territory, and leads from “Event Attendees” to the “Event Sales” territory.
Alternatives to territory management in Salesforce
Salesforce’s built-in territory management system isn’t the only option for sales teams to automate lead, account, and opportunity assignment. In fact, for many organizations, the complexity of Salesforce’s ETM features outweighs its benefits.
Setting up ETM requires a lot of manual work for Salesforce admins and RevOps teams. Plus, Salesforce lead management settings are completely separate from ETM. If you use both features, Salesforce admins have to invest more time in monitoring data consistency, updating configurations, and training users. You might even need to bring in a Salesforce developer to build custom solutions or use third-party AppExchange apps to bridge the gap between lead management and territory management, further adding to your costs and workload.
If all that has your head spinning, don’t worry — there are other options!
For a slightly simpler setup, you can use Salesforce lead assignment rules without ETM. Salesforce's built-in lead assignment rules are customizable criteria used to automatically route lead records to the right user or queue. Like territory assignment rules, lead assignment rules consider factors like geographic location, industry, company size, and lead source.
If your team uses geographic sales territories, you can use lead assignment rules to route leads from specific states or countries to sales representatives who understand the regional market. For example, if the state/province equals Alaska, Arizona, California, Hawaii, Nevada, Oregon, or Washington, assign the lead to the West Coast queue. A lead queue is essentially a bucket for unassigned leads, and you can choose which sales reps can pull leads from each queue.
(If you have both lead assignment rules and territory management rules set up, the former fire when the lead is created in Salesforce. When the rep converts the lead to an opportunity, an account is created, and the territory management rules kick in. Why do some sales orgs use both? Lead assignment rules help automate initial lead routing, while ETM supports long-term territory management, account reassignment, performance analysis, and organizing complex sales structures.)
Built-in lead assignment rules are a solid starting point to automate lead routing. But if you use Salesforce on its own, your reps might still spend a ton of time on lead reassignment to balance their workload, manually qualify leads, and email back-and-forth to schedule sales calls.
That’s where Calendly comes in.
Improve Salesforce territory management with Calendly
Your scheduling automation platform can be an excellent lead generation, qualification, and routing tool. Calendly’s Salesforce integration helps your team be more efficient and organized while creating a better experience for prospective customers.
When a lead books a meeting via a sales rep or team’s Calendly booking page, Salesforce automatically creates a new lead, contact, or opportunity. If the lead already exists in your Salesforce instance, the event is added to the lead’s existing record, so you don’t end up with duplicate lead records or time-consuming manual reassignment.
What if you don’t want to let just anyone book a meeting with your team? When you add Calendly Routing to your marketing forms, you can show scheduling pages only to leads who meet your qualifications, like prospects from specific industries or companies of a certain size. That way, your busy team can spend time on the most valuable deals.
Calendly Routing works with HubSpot, Marketo, Pardot, and Calendly forms and is built for your Salesforce CRM. You can use any form field (email, domain, company name) in any Salesforce standard object to match visitors with their account owner. Account lookups let you send known leads or customers from your website form directly to their account owner’s booking page without manually reassigning leads to the right rep.

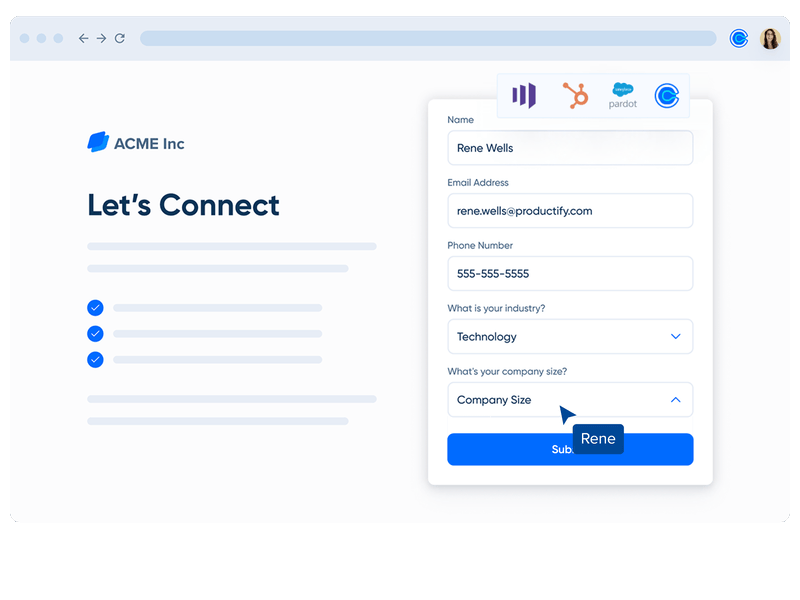
Remember our imaginary enterprise software company, Acme Inc.? Each of Acme’s sales reps specializes in a certain industry. When a lead or opportunity matches that industry, they’re automatically assigned to the correct rep.
Instead of relying on Salesforce’s complex territory management features, Acme uses Calendly to simplify lead routing, qualification, and booking. Here’s what that looks like in action:
A website visitor named Halle fills out Acme’s “contact sales” form, which is already built in HubSpot, connected to Calendly Routing, and enriched with Clearbit.
She enters her email address in the form, and Clearbit fills in the company name (Rats & Co.), size (5,000+ employees), and industry (IT). This shortens the form, so Halle only has to input her name and job title.
Calendly checks to see if Rats & Co. has an account in Acme’s Salesforce instance. They don’t, so the next step is lead qualification.
Based on Halle’s information — company size, industry, job title — she’s a highly qualified lead. Acme assigns leads to reps based on industry and company size, so she’s automatically routed to the booking page for Acme’s enterprise IT sales team.
Halle is happy about that, and immediately books a meeting time that works for her, with the exact team she needs to talk to.
On the backend, Calendly’s Round Robin meeting distribution is set to optimize for availability, so it assigns the meeting to the first available enterprise IT sales rep. This automation helps Acme’s sales team respond to meeting requests faster, hold initial sales calls sooner, and balance the workload across reps.
Calendly creates a lead record in Salesforce with the info Halle entered into the website form (including the data from Clearbit) and an activity log of any meetings she books with the Acme team via Calendly.
“A good tool is one that’s so simple, sales reps can basically forget about it and let the meetings roll in. That’s essentially what happened when we implemented Calendly.”

Julia Pan
Sales Enablement Manager at SignPost
What happens if a lead doesn’t qualify for a meeting? Instead of sending them to a booking page, you can display a custom message with next steps, ask them for more information, or redirect them to a specific URL, like a webinar signup page.

Automating lead assignment with Calendly Routing has been a game changer for RCReports, a compensation analysis solution for accountants and business valuators. Before connecting Calendly Routing with their Salesforce instance, RCReports’ AEs spent at least five hours a month reassigning leads booked on the wrong calendar. This created a disjointed customer experience and frustration for the sales and marketing teams.
“Now that we’ve implemented Calendly’s routing feature with Salesforce integration, demos are always booked with the correct AE, reducing friction for both our team and the customer.”

Abbie Deaver
Director of Marketing at RCReports
Users on Calendly’s Teams plan and above can connect Calendly to Salesforce. The full suite of Salesforce routing features, including routing by Salesforce ownership, is available on Calendly’s Enterprise plan.
To learn more about Calendly Routing, get in touch with our sales team.
Get more done and close more deals with automated lead routing
Whether you use Enterprise Territory Management, lead assignment rules, a third-party tool, or a combination of all three, automating Salesforce lead assignment and routing gives sales teams more time to focus on connecting with prospects and closing deals.
Keep high-value leads from slipping through the cracks, balance the workload across the team, and match leads and accounts with the sales reps best equipped to help them. The results? More productivity, a faster sales cycle, higher conversion rates, and a better customer experience.

Webinar: How Calendly Uses Calendly to Close More Deals
Related Articles


![[Blog Hero] How to write sales follow-up emails that keep deals moving](https://images.ctfassets.net/k0lk9kiuza3o/2jnxlw4N57RFSC8QoRZcs1/510f5f21bafe1009b54c1b7a87bfa67f/Sales_follow-up_emails.png?w=2400&q=85&fm=avif)
Don't leave your prospects, customers, and candidates waiting
Calendly eliminates the scheduling back and forth and helps you hit goals faster. Get started in seconds.