💥 Our new & improved browser extension lets you manage your meetings, scheduling links, and contacts in a single click


Table of contents
When students need help with a project, have questions about an assignment, or want to go over their plans, office hours offer college faculty the chance to help.
Many educational institutions have revamped the way they teach. Though some institutions have chosen a hybrid of in-person and digital learning, many classes are still being offered online. Same goes for professors' office hours.
Whether your office hours are virtual or in person, Calendly is the easiest way for students and teachers to find time together.
A new approach to office hours
In an article for Inside Higher Ed, Jennifer L. Brinkley describes polling her students about how they'd like to set up office hours with her. She gave them the option of video calls on a set day and time, or emailing her to make appointments at their convenience. They overwhelmingly chose the second option. Says Brinkley:
“I thought the first suggestion would be the desired response, as it was a specific opportunity for students to meet, and I would be available without them having to schedule a specific time. Based on the survey results, my initial thought was wrong. Overwhelmingly, students wanted to reach out to me at their convenience via email and to schedule a time to meet online if necessary.”
Letting students make their own appointments was what made the most sense to them. And as long as you have the right tools, it’s an easy decision to support. Automating scheduling with Calendly allows you to focus on what matters most: delivering a better educational experience.
If you're not already using Calendly, now is a great time to sign up for free!
Using Calendly to schedule office hours
No matter what kind of appointment you’re scheduling, Calendly offers a simple and powerful way to do it. It integrates with just about any calendar app you’re using, from Outlook to Apple Calendar. You tell Calendly your schedule, and it’ll make sure you're never double-booked. Program in your availability, and let your students pick the day and time that’s best for them.
Educational institutions from Dartmouth to the College for Creative Studies are using Calendly to create a better student experience. It’s one of the top integrations for Zoom, and it can be used to seamlessly schedule your next online appointment for office hours with your students.
How to create an appointment in Calendly
Scheduling an appointment for office hours with Calendly can be done in just a few simple steps and with greater customizability than scheduling your appointments in Canvas.
1. Choose the Event Type
From your Calendly homepage, click the "New Event Type" button in the top right corner.
You’ll see four kinds types of events: one-on-one, group, collective, and Round Robin. If you want to schedule a traditional office hour-style appointment for a one-on-one meeting with a student, choose the one-on-one option.
2. Add general meeting information
Now that you’ve created the event, you’ll need to give it a name, location (including video conferencing options), and duration.
Once the event information has been added, click "Continue."
3. Create meeting time slots
To make sure you never double-book or overbook, you’ll need to tell Calendly your schedule.
The first step is to determine your availability under "Date range." This will tell the system how far in advance to let students book an appointment with you. The default is set to 60 rolling days, meaning a student can set an appointment up to 60 days out from any given day. Under Scheduling settings, you have a few options to change this if you like:
Change the period of rolling days: For example, if you only want students to be able to book two weeks ahead, you can change it to 14 days instead of the default 60.
Change the availability to "Within a date range": Don’t allow appointments to be booked past a certain day. In your case, that would be the end of the semester.
Allow appointments to be booked "Indefinitely into the future": This places no restrictions on when someone can book an appointment with you.
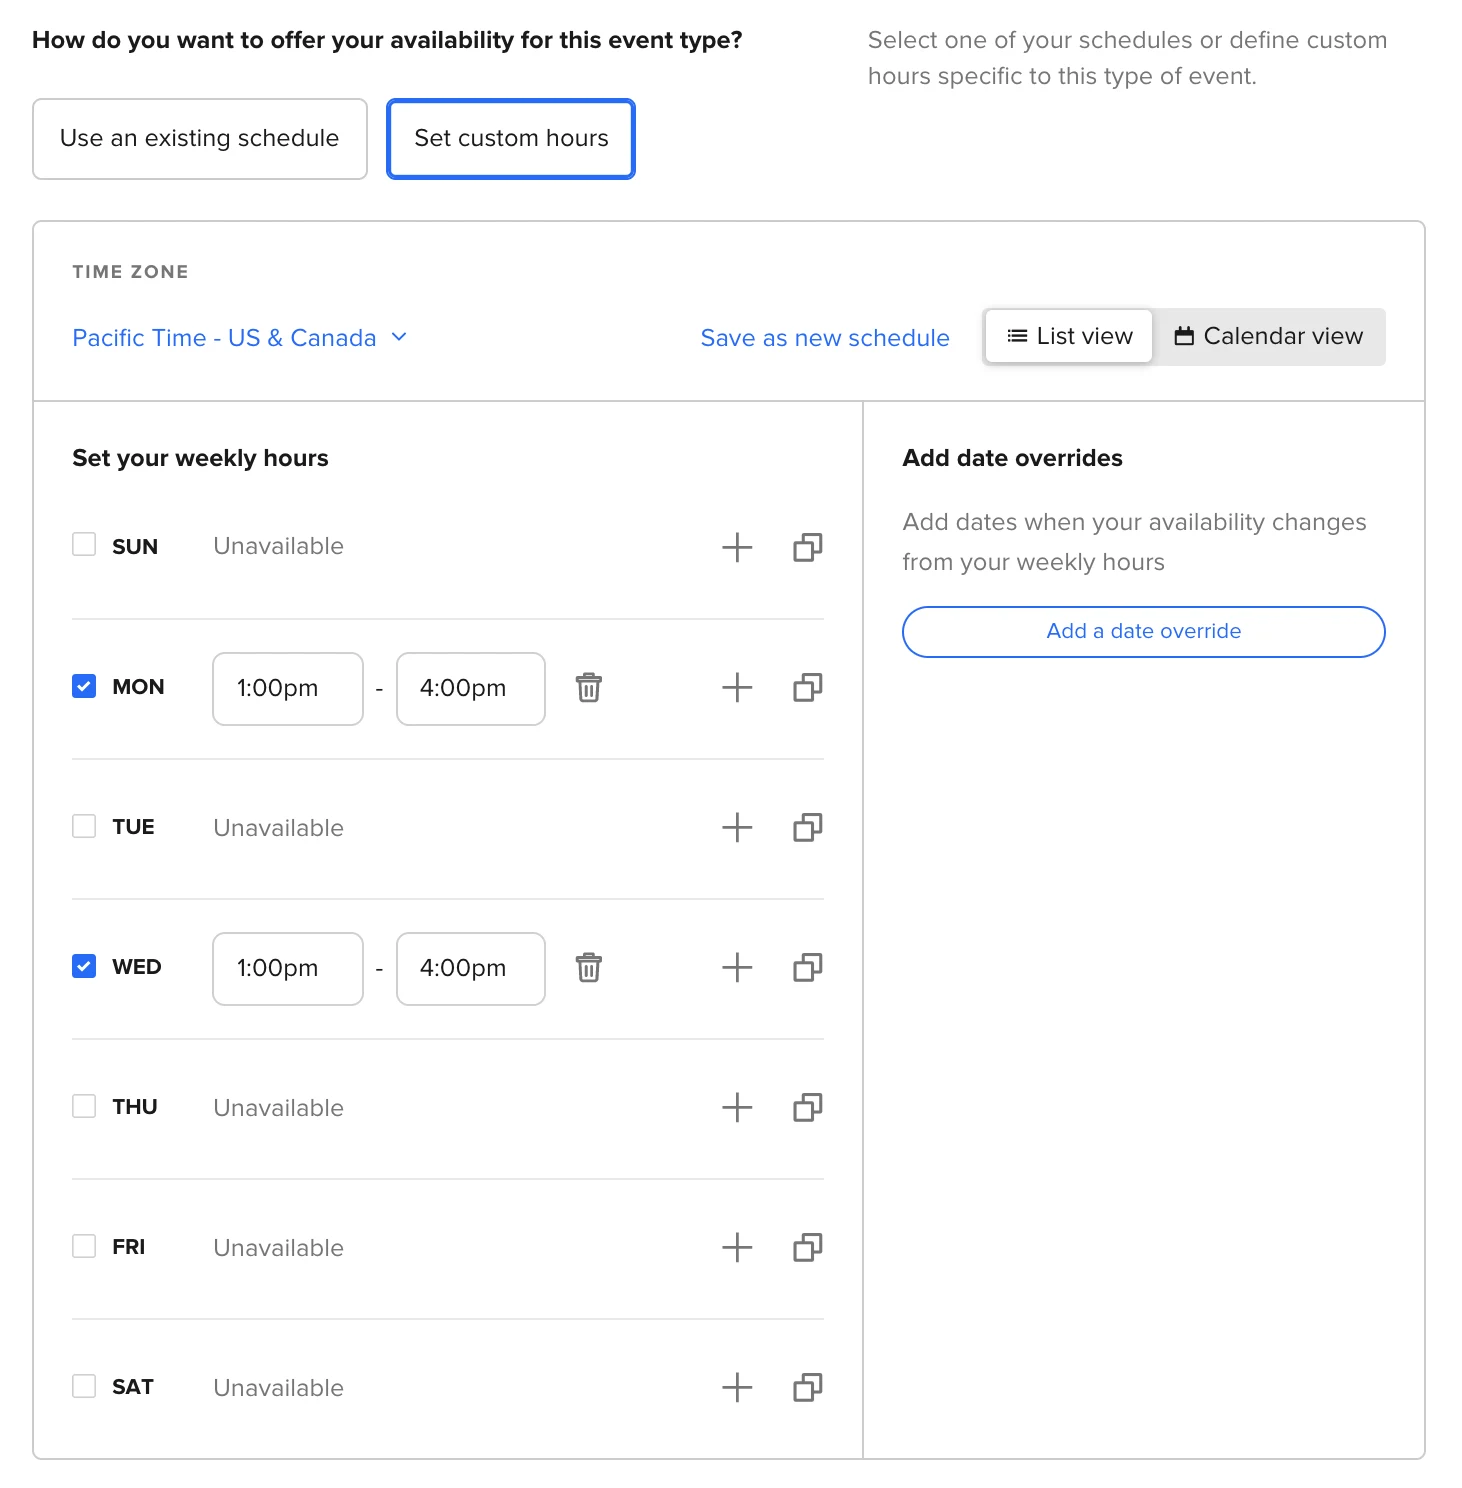
4. Choose date and time ranges
Once you’ve settled on availability, you’ll decide an actual range of days and times you’ll be open to making appointments. The default is 9 a.m. to 5 p.m. Monday through Friday, but you can customize which blocks of time you'll be available for office hours under "Available hours."
Pick your desired days and times. Say you want to have office hours on Monday and Wednesday from 10 a.m. to 1 p.m. in 30-minute time slots. De-select every other day of the week, and change the hour ranges for Monday and Wednesday:
5. Configure any additional availability rules
There are a few more ways to customize your availability under "Scheduling settings":
"Buffer time" lets you choose whether you'd like to add buffers before or after each appointment, in case you want to make sure you get a break between meetings.
"Start time increments" lets you determine how often a time slot is available. Set this as equal to the length of your meeting time — in this case, 30 minutes.
"Minimum notice" gives you a buffer between when someone schedules a meeting and the meeting time. Program in some time here so you won’t have anyone scheduling a meeting moments before it’s supposed to happen. For example, if you program in a four-hour minimum notice, students won’t be able to schedule a meeting fewer than four hours before your time slot.
"Daily limit" lets you cap the number of slots that can be booked in a given day. Leave this blank to keep all time slots available to your students.
When you’ve gone through all these options, click "Save and close." You're ready to share your scheduling link!
You're ready to start scheduling office hours via Calendly!

E-book: Create a better student experience with automation
Managing your office hours
To manage your meetings, log into Calendly and review the Event Types on your home page. You’ll see the event you set up for your office hour meetings. If you want to edit that event, just click the gear symbol on the right. Any Calendly user on a paid plan can have multiple events set up at a time.
To distribute the booking link to your students, click "Copy link" next to the event on the Event Types page. You can copy/paste it into the web platform your students are using, or send out a mass email.
When a student clicks the link in the email, they’ll see a variety of days they can choose from. Once they choose a day, the system lets them pick a time within the window you set. After choosing their time and entering their information, they’ll get a confirmation email.
To see a list of upcoming meetings that students have booked with you, click on "Scheduled events" in the sidebar. Time slots that haven’t been booked won’t show up. Both parties also automatically get an email notification whenever a meeting gets booked through Calendly.
Connect Calendly with Zoom for virtual office hours
For virtual office hours via Zoom, you'll want to make sure to connect Calendly to your Zoom account. Once you’ve done that, a dynamic video conference link will be created for every scheduled meeting. You’ll also be able to select Zoom under the Location tab when editing your meeting events.
That's it!
And there you have it — everything you need to schedule your virtual office hour meetings. Once you’ve programmed everything in up front, the rest is easy and automatic.
Visit our site for educators to learn more about Calendly's education solutions, and see what we can do to make teaching online a little easier.
Get started with Calendly
Related Articles
![[Blog hero] Add availability to email](https://images.ctfassets.net/k0lk9kiuza3o/ceL6bq1C7BCcFmoxi5rEQ/c4ed2e17a63372b12ea54d7496dfaa7c/Calendly_InsertAvailability_BlogHeader_1920x1080.png?q=85&fm=webp)


Don't leave your prospects, customers, and candidates waiting
Calendly eliminates the scheduling back and forth and helps you hit goals faster. Get started in seconds.
Calendly eliminates the scheduling back and forth and helps you hit goals faster. Get started in seconds.